Have a look around
Check out the video tutorials below or take a self-paced look at our other, text-based ‘Getting Started’ course materials.
Model construction interface
After downloading and opening Morpheus, you’ll see the model construction interface:
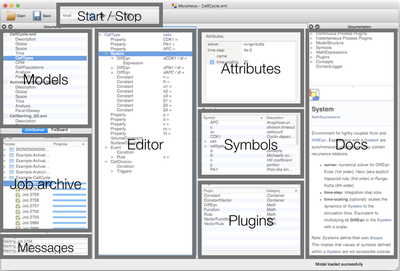
From left to right, we see the Models panel where you see all the opened models and their main sections. Below, you have the Job archive where you can see the progress of running simulations and browse through all simulation results. In the middle, we have the Editor where you’ll spend most of your time adding and removing model elements, which are listed in the Model Components/Plugins panel to the right. Next to that, in the Attributes panel you can enter parameter values and mathematical expressions using the Symbols listed below. In addition, we see the context-sensitive Documentation panel that shows the description of the currently selected model component.
To parametrize a model, left-click on model elements in the Editor panel (you may extend/hide multi-line elements by clicking on the small arrow symbol in front of model elements) and adjust the details and parameter values in the Attributes panel.
To edit the model structure in the Editor panel, right-click with your mouse on any model element or on the white area under your last model element. This opens a small context-menu with edit options.
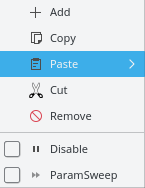
Note the Disable option to toggle on/off model components for rapid exploration of model variants. Also use the Copy/Paste options from this menu for rapid model development. Your keyboard’s Ctrl-C/Ctrl-V on Linux or Windows or Cmd-C/Cmd-V on macOS only works for selected text attributes of model elements but not for entire selected model elements.
To add new model elements, use Add from the menu which will offer you all meaningful model extensions for the currently right-clicked context. Alternatively, you can double-left-click on offers inside the Plugins panel, which re-sort depending on your current context, to add the respective element. To activate an entire model section (Global, CellTypes, CPM, CellPopulations, or Analysis), you can click on that section name inside the left top-level model overview (Models panel).
Start a simulation
When you start a simulation by pressing the Start button in the top menu, you’ll switch to the simulation interface:
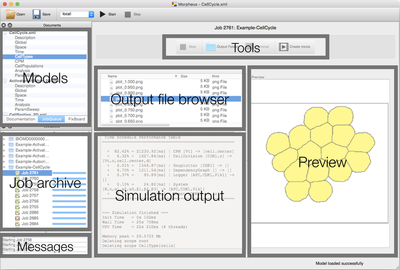
Now, in the middle, you’ll see the Simulation output with e.g. the simulation schedule, current time and performance stats. The Output file browser above shows the simulation output files, i.e. CSV files, plots, images, etc. If you select a text or image file, it will open in the Preview panel to the right.
With the Tools above, you can open the folder in a file browser or terminal, or create a movie from a sequence of output images.
In-app documentation
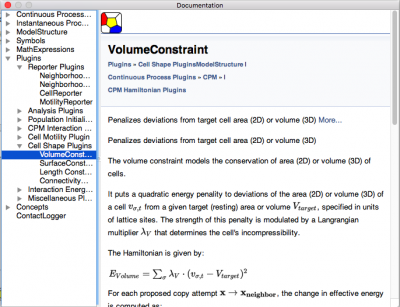
We improved the context-sensitive documentation by using Doxygen-generated HTML rendering of the documentation (using Qt WebKit). Docs are both context-sensitive and can be searched (using Qt Help framework) and can include $\LaTeX$-based maths (displayed using MathJax):
Video tutorials
Spatial modeling using Morpheus
In this video tutorial, you’ll learn how to build and run a spatiotemporal model in Morpheus from scratch.
Model setup
Watch this video to get a more detailed insight into how to set up a model.
Modeling chemotaxis
Discover how to model chemotaxis with a chemoattractant field, CPM cell dynamics and how to create a visualization for it.